The Artistic Home: An Easter Centerpiece
- Julia Kulish

- Mar 27, 2021
- 3 min read

Easter is just around the corner. This is an important holiday in our family and a day of celebration and lovely traditions. I love to fill the house with all the signs of the new life of Spring, including a centerpiece for our table.
When my kids were little we would do fun centerpieces, like making a “He is risen“ garden tomb centerpiece. In a large, wide opening pot we would mound the dirt around a little mini pot on it’s side, planting grass seed in the dirt. We would put a rock big enough to cover the opening of the mini pot in front of it, and a stick made cross on the top of the mound. The kids loved watching the grass grow on their dining room table and on Easter morning, I would remove the stone in front of the mini tomb as I gathered the Easter baskets for the kids.
We don’t have any pictures or our past “garden tomb” centerpieces, but here is a sample I found of someone else’s. It’s a fun idea to do together with the kiddos.
Now that my kids are older ( and most are adults), I can get a little more sophisticated with the centerpieces. No matter what I do, it has to follow a few criteria:
1. It has to be asthetically pleasing
2. I has to be colorful
3. It has to have an over all appeal to all ages ( I have grand babies now!)
4. It has to be made inexpensively
That fourth one I am a stickler about. It goes back to our early marriage days when we were living on love ( and not much else!). Even with just a little, I am convinced that anyone can bring beauty into their home and lives.
This year I revisited a project I had done a few years back, because it was simple to do, bright an colorful, and one of my all time favorites.
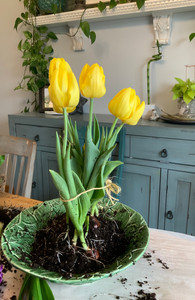
I started off by purchasing four little planters of Spring flowers from the nearest discount store. Each pot was five dollars (and I probably could have gotten by with three). My planters contained Tulips in yellow and pink, and Hyacinths.
I carefully took out all the plants and separated them, taking care not to tear apart the roots too badly. I also gathered all of the extra dirt into one container to spread on over the course of replanting.
I got into my pantry and pulled out a wide mouthed serving bowl (this one, with it’s pretty green, is perfect for Spring). Try to get a fairly deep one, but don’t fret over it too much. The plants will only be in there a week or two.
I began to replant the flowers, tallest to shortest, starting in the center of the bowl and working my way out. I used a little twine to tie the stems loosely together so they didn’t flop over. I continued to widen the twine circle as I added more and more flowers.
I love this bright, chaotic mess, creating something beautiful requires. On a side note, I was glad my husband wasn’t home to see the mess I was making of our dining room (although, after 32 years, he’s probably come to expect it!)
FInally, when all of the flowers were replanted, I covered the exposed dirt with moss. Now those of you who know me, know that I have what is close to an obsession with moss - that color, that texture, so beautiful! Also, it helps keep moisture in, keeps the dirt from washing away, and, again, it’s so beautiful.
I got my moss from either scraping it off of foot paths in my yard or pulling it off of last year’s outdoor planters. Moss isn‘t necessary, but is a bit like the cherry on top.
And there you have it - simple, yet elegant, and full of color. And all for around twenty dollars. There’s nothing like bringing a little of nature inside ( did I mention how wonderful the Hyacynth is making our whole house smell?!). Bring on the Easter egg hunts, the family all around the table, and the celebration of Easter!


Comments